# 《Spring核心技术》第19章-环境变量型注解:深度解析@Profile注解
作者:冰河
星球:http://m6z.cn/6aeFbs (opens new window)
博客:https://binghe.site (opens new window)
文章汇总:https://binghe.site/md/all/all.html (opens new window)
源码地址:https://github.com/binghe001/spring-annotation-book/tree/master/spring-annotation-chapter-19 (opens new window)
沉淀,成长,突破,帮助他人,成就自我。
大家好,我是冰河~~
本章难度:★★★★☆
本章重点:进一步学习并掌握@Profile注解隔离环境的案例和流程,从源码级别彻底掌握@Profile注解在Spring底层的执行流程。
本章目录如下所示:
- 学习指引
- 注解说明
- 注解源码
- 使用场景
- 使用案例
- 注解标注到方法上
- 注解标注到类上
- 使用默认的环境
- 源码时序图
- 源码解析
- 总结
- 思考
- VIP服务
# 一、学习指引
Spring中的@Profile注解,你真的彻底了解过吗?
在实际开发项目的过程中,往往会将环境分为开发环境、测试环境和生产环境,每个环境基本上都是互相隔离的。在以前的开发过程中,如果开发人员完成相应的功能模块并通过单元测试后,会通过手动修改配置文件的方式,将配置修改成测试环境,发布到测试环境进行测试。测试通过后,再将配置修改成生产环境,发布到生产环境。这样通过手动修改配置文件的方式,一方面会增加项目开发和运维的工作量,另一方面,每次都需要手动修改配置文件就非常容易出问题。
# 二、注解说明
关于@Profile注解的一点点说明~~
在实际开发过程中,可以使用@Profile隔离开发环境、测试环境和生产环境。也就是说,如果在IOC容器中存在多个类型相同的Bean,就可以使用@Profile注解标识使用哪个Bean,在开发环境、测试环境和生产环境可以在不修改代码的前提下,使用@Profile注解切换要使用的Bean。例如,在开发环境、测试环境和生产环境需要连接不同的数据库,此时就可以使用@Profile注解实现。
# 2.1 注解源码
@Profile注解的源码详见:org.springframework.context.annotation.Profile。
/**
 * @author Chris Beams
 * @author Phillip Webb
 * @author Sam Brannen
 * @since 3.1
 */
@Target({ElementType.TYPE, ElementType.METHOD})
@Retention(RetentionPolicy.RUNTIME)
@Documented
@Conditional(ProfileCondition.class)
public @interface Profile {
	String[] value();
}
2
3
4
5
6
7
8
9
10
11
12
13
从@Profile注解的源码可以看出,@Profile注解是从Spring3.1版本开始提供的注解,可以将注解标注到类上和方法上,在注解中提供了一个Spring数组类型的value属性,含义如下所示。
- value:指定环境的标识。
注意:@Profile不仅可以标注在方法上,也可以标注在配置类上。如果标注在配置类上,只有在指定的环境时,整个配置类里面的所有配置才会生效。如果一个Bean上没有使用@Profile注解进行标注,那么这个Bean在任何环境下都会被注册到IOC容器中。
# 2.2 使用场景
在项目的开发过程中,往往会分成开发环境、测试环境和生产环境,可以使用@Profile注解针对不同的环境配置不同的运行时参数,从而使得程序不用修改代码就能在不同的环境下运行。例如,可以使用@Profile注解切换不同环境下的数据库连接和配置信息等。
# 三、使用案例
一起实现@Profile注解的案例,怎么样?
本章,使用@Profile注解模拟实现开发环境、测试环境和生产环境的配置。在具体实现中,会按照@Profile注解标注到方法上、标注到类上和使用默认的环境三个方面实现案例。
# 3.1 注解标注到方法上
本节,主要将@Profile注解标注到方法上来模拟实现开发环境、测试环境和生产环境的配置,具体实现的步骤如下所示。
(1)新增ProfileBean类
ProfileBean类的源码详见:spring-annotation-chapter-19工程下的io.binghe.spring.annotation.chapter19.bean.ProfileBean。
public class ProfileBean {
    private String env;
    public ProfileBean(String env) {
        this.env = env;
    }
    @Override
    public String toString() {
        return "ProfileBean{" +  "env='" + env + '}';
    }
}
2
3
4
5
6
7
8
9
10
可以看到,ProfileBean类就是一个普通的Java类,在ProfileBean类中,提供了一个String类型的成员变量env,表示当前的环境信息,并通过ProfileBean类的构造方法赋值,最后提供了toString()方法,打印ProfileBean类的信息。
(2)新增ProfileConfig类
ProfileConfig类的源码详见:spring-annotation-chapter-19工程下的io.binghe.spring.annotation.chapter19.config.ProfileConfig。
@Configuration
public class ProfileConfig {
    @Profile("dev")
    @Bean("profileBeanDev")
    public ProfileBean profileBeanDev(){
        return new ProfileBean("开发环境");
    }
    @Profile("test")
    @Bean("profileBeanTest")
    public ProfileBean profileBeanTest(){
        return new ProfileBean("测试环境");
    }
    @Profile("prod")
    @Bean("profileBeanProd")
    public ProfileBean profileBeanProd(){
        return new ProfileBean("生产环境");
    }
}
2
3
4
5
6
7
8
9
10
11
12
13
14
15
16
17
18
可以看到,在ProfileConfig类上标注了@Configuration注解,说明ProfileConfig类是案例程序的配置类,并且在ProfileConfig类中使用@Bean注解结合@Profile注解向IOC容器中,根据不同的环境向IOC容器中注入对应的Bean对象。模拟实现开发环境、测试环境和生产环境。
(3)新增ProfileTest类
ProfileTest类的源码详见:spring-annotation-chapter-19工程下的io.binghe.spring.annotation.chapter19.ProfileTest。
public class ProfileTest {
    public static void main(String[] args) {
        AnnotationConfigApplicationContext context = new AnnotationConfigApplicationContext();
        context.getEnvironment().setActiveProfiles("dev");
        context.register(ProfileConfig.class);
        context.refresh();
        ProfileBean profileBean = context.getBean(ProfileBean.class);
        System.out.println(profileBean);
    }
}
2
3
4
5
6
7
8
9
10
可以看到,在ProfileTest类的main()方法中,会在IOC容器的环境中指定环境标识dev,也就是说,指定的环境是开发环境。然后在IOC容器中注册ProfileConfig类的Class对象,刷新IOC容器后,从IOC容器中获取ProfileBean类的Bean对象并进行打印。
(4)运行ProfileTest类
运行ProfileTest类的main()方法,输出的结果信息如下所示。
ProfileBean{env='开发环境}
从输出的结果信息可以看出,此时打印的环境信息是开发环境。
说明@Profile注解标注到方法上,能够根据不同的环境指定使用不同的Bean。
# 3.2 注解标注到类上
本节的案例程序会在3.1节的基础上实现将@Profile注解标注到类上。具体实现步骤如下所示。
(1)修改ProfileConfig类
在ProfileConfig类上标注@Profile注解,并指定环境标识为prod,如下所示。
@Profile("prod")
@Configuration
public class ProfileConfig {
    @Profile("dev")
    @Bean("profileBeanDev")
    public ProfileBean profileBeanDev(){
        return new ProfileBean("开发环境");
    }
    @Profile("test")
    @Bean("profileBeanTest")
    public ProfileBean profileBeanTest(){
        return new ProfileBean("测试环境");
    }
    @Profile("prod")
    @Bean("profileBeanProd")
    public ProfileBean profileBeanProd(){
        return new ProfileBean("生产环境");
    }
}
2
3
4
5
6
7
8
9
10
11
12
13
14
15
16
17
18
19
可以看到,尽管在ProfileConfig类中使用@Profile注解指定了开发环境dev,测试环境test和生产环境prod,但是在ProfileConfig类上使用@Profile注解指定的是生产环境prod。
(2)运行ProfileTest类
运行ProfileTest类的main()方法,输出的结果信息如下所示。
Exception in thread "main" org.springframework.beans.factory.NoSuchBeanDefinitionException: No qualifying bean of type 'io.binghe.spring.annotation.chapter19.bean.ProfileBean' available
可以看到,结果信息中输出了ProfileBean类的Bean对象不存在的异常。
(3)修改ProfileTest类
将ProfileTest类的main()方法中的环境标识修改成prod,如下所示。
public static void main(String[] args) {
    AnnotationConfigApplicationContext context = new AnnotationConfigApplicationContext();
    context.getEnvironment().setActiveProfiles("prod");
    context.register(ProfileConfig.class);
    context.refresh();
    ProfileBean profileBean = context.getBean(ProfileBean.class);
    System.out.println(profileBean);
}
2
3
4
5
6
7
8
可以看到,在ProfileTest类的main()方法中,已经将环境标识由dev修改成了prod。
(4)运行ProfileTest类
再次运行ProfileTest类的main()方法,输出的结果信息如下所示。
ProfileBean{env='生产环境}
可以看到,输出的结果信息是生产环境。
说明:当@Profile注解标注到类上时,虽然类中的方法上也标注了@Profile注解,但是整体上会以类上标注的@Profile注解为准。如果设置的环境标识与类上标注的@Profile注解中的环境标识不匹配,则整个类中的配置都不会生效。否则,类中没有使用@Profile注解标识的Bean和环境标识与方法上使用@Profile注解指定的环境标识匹配的Bean才会生效。
# 3.3 使用默认的环境
当使用@Profile注解指定了环境标识时,如果在启动IOC容器时,没有设置对应的环境标识就会抛异常。此时可以提供一个默认的环境配置,使得启动IOC容器时,如果没有设置对应的环境标识,就使默认的环境配置生效。案例的具体实现步骤如下所示。
(1)修改ProfileTest类
修改ProfileTest类的main()方法,去除指定的环境标识,如下所示。
public static void main(String[] args) {
    AnnotationConfigApplicationContext context = new AnnotationConfigApplicationContext(ProfileConfig.class);
    ProfileBean profileBean = context.getBean(ProfileBean.class);
    System.out.println(profileBean);
}
2
3
4
5
可以看到,在ProfileTest类的main()方法中,传入ProfileConfig类的Class对象创建IOC容器后,直接从IOC容器中获取ProfileBean类的Bean对象并打印。
(2)运行ProfileTest类
运行ProfileTest类的main()方法,输出的结果信息如下所示。
Exception in thread "main" org.springframework.beans.factory.NoSuchBeanDefinitionException: No qualifying bean of type 'io.binghe.spring.annotation.chapter19.bean.ProfileBean' available
可以看到,当配置类中的Bean使用@Profile注解指定了环境标识时,如果程序运行时,未指定环境标识从IOC容器中获取Bean,就会抛出NoSuchBeanDefinitionException异常。
(3)修改ProfileConfig类
去除ProfileConfig类上的@Profile注解,并在ProfileConfig类中使用@Profile注解提供一个默认的环境配置,如下所示。
@Profile("default")
@Bean("profileBeanDefault")
public ProfileBean profileBeanDefault(){
    return new ProfileBean("默认环境");
}
2
3
4
5
(4)运行ProfileTest类
运行ProfileTest类的main()方法,输出的结果信息如下所示。
ProfileBean{env='默认环境}
可以看到,正确输出了默认的环境信息。
说明:当Bean使用@Profile注解指定了环境信息时,如果程序运行时,未指定环境标识从IOC容器中获取Bean,就会抛出NoSuchBeanDefinitionException异常。此时,可以使用@Profile注解提供一个默认的环境配置,随后在IOC容器启动时,就会使默认的环境配置生效,此后未指定环境标识从IOC容器中获取Bean,就会获取到默认环境配置的Bean对象。
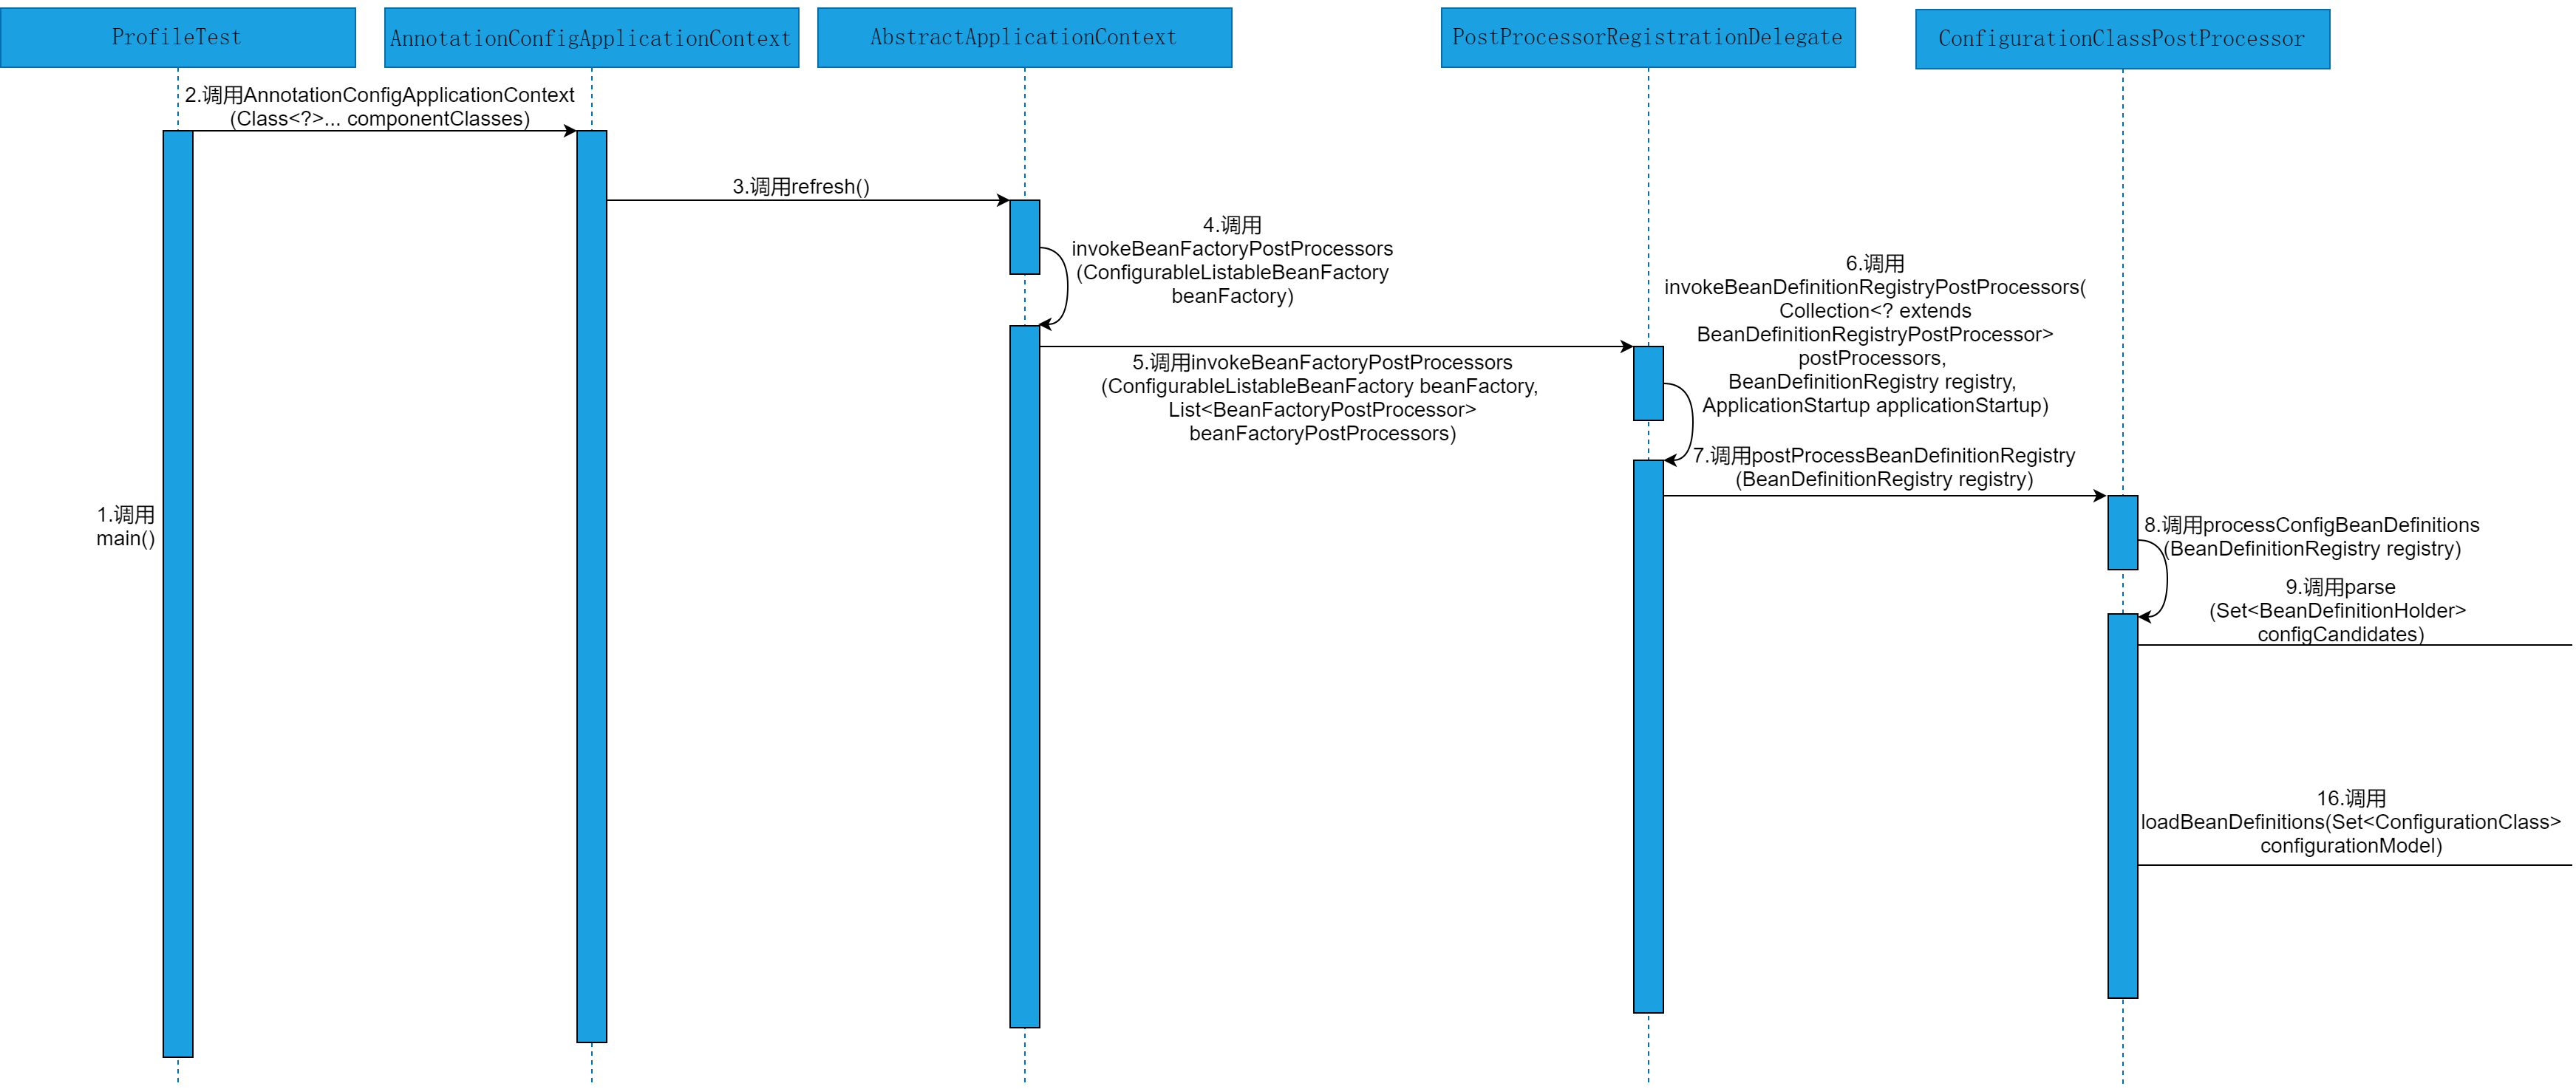
# 四、源码时序图
结合时序图理解源码会事半功倍,你觉得呢?
本章,就简单介绍下@Profile注解的源码时序图。@Profile注解的源码时序图如图19-1~19-2所示。
# 查看完整文章
加入冰河技术 (opens new window)知识星球,解锁完整技术文章与完整代码