# 《Spring核心技术》第11章-注入数据型注解:深度解析@Value注解
作者:冰河
星球:http://m6z.cn/6aeFbs (opens new window)
博客:https://binghe.site (opens new window)
文章汇总:https://binghe.site/md/all/all.html (opens new window)
源码地址:https://github.com/binghe001/spring-annotation-book/tree/master/spring-annotation-chapter-11 (opens new window)
沉淀,成长,突破,帮助他人,成就自我。
大家好,我是冰河~~
本章难度:★★★★☆
本章重点:进一步学习并掌握@Value注解向Bean中注入值的案例和流程,从源码级别彻底掌握@Value注解在Spring底层的执行流程。
本节目录如下所示:
- 学习指引
- 注解说明
- 注解源码
- 使用场景
- 注解用法
- 使用案例
- 源码时序图
- 解析并获取@Value修饰的属性
- 为@Value修饰的属性赋值
- 使用@Value获取属性的值
- 源码解析
- 解析并获取@Value修饰的属性
- 为@Value修饰的属性赋值
- 使用@Value获取属性的值
- 总结
- 思考
- VIP服务
# 一、学习指引
Spring中的@Value注解,你真的彻底了解过吗?
在实际开发过程中,通常会有这样一种场景:将一些配置项写到配置文件中,在业务逻辑中会读取配置文件中的配置项,取出对应的值进行业务逻辑处理。Spring中提供的@Value注解就可以读取配置文件中的值。另外@Value注解也可以向Bean中的属性设置其他值。本章,就对@Value注解进行简单的介绍。
# 二、注解说明
关于@Value注解的一点点说明~~
@Value注解可以向Spring的Bean的属性中注入数据。并且支持Spring的EL表达式,可以通过${} 的方式获取配置文件中的数据。配置文件支持properties、XML、和YML文件。
# 2.1 注解源码
@Value注解的源码详见:org.springframework.beans.factory.annotation.Value。
/**
 * @author Juergen Hoeller
 * @since 3.0
 * @see AutowiredAnnotationBeanPostProcessor
 * @see Autowired
 * @see org.springframework.beans.factory.config.BeanExpressionResolver
 * @see org.springframework.beans.factory.support.AutowireCandidateResolver#getSuggestedValue
 */
@Target({ElementType.FIELD, ElementType.METHOD, ElementType.PARAMETER, ElementType.ANNOTATION_TYPE})
@Retention(RetentionPolicy.RUNTIME)
@Documented
public @interface Value {
	String value();
}
2
3
4
5
6
7
8
9
10
11
12
13
14
从源码可以看出,@Value注解可以标注到字段、方法、参数和其他注解上,@Value注解中提供了一个String类型的value属性,具体含义如下所示。
- value:指定要向Bean的属性中注入的数据,数据可以是配置文件中的配置项,并且支持EL表达式。
# 2.2 使用场景
在实际开发中,项目中难免会有一些配置信息,此时,就可以将这些配置信息统一写到配置文件中。随后使用@Value注解读取配置文件的值来向Spring中Bean的属性设置值。
例如,一些系统环境变量信息,数据库配置,系统通用配置等等,都可以保存到配置文件中,此时就可以使用Spring的EL表达式读取配置文件中的值。
# 2.3 注解用法
本节,主要介绍不通过配置文件注入属性和通过配置文件注入属性两种情况来介绍@Value注解的用法。
1.不通过配置文件注入属性
通过@Value可以将外部的值动态注入到Bean中,有如下几种用法。
(1)注入普通字符串
@Value("normalString")
private String normalString;
2
(2)注入操作系统属性
@Value("#{systemProperties['os.name']}")
private String osName;
2
(3)注入表达式的结果信息
@Value("#{ T(java.lang.Math).random() * 100.0 }")
private double randomNum;
2
(4)注入其他Bean属性
@Value("#{otherBean.name}")
private String name;
2
(5)注入文件资源
@Value("classpath:config.properties")
private Resource resourceFile;
2
(6)注入URL资源
@Value("http://www.baidu.com")
private Resource url;
2
2..通过配置文件注入属性
通过@Value(“${app.name}”)语法将属性文件的值注入到bean的属性中,
@Component
@PropertySource({"classpath:config.properties","classpath:config_${anotherfile.configinject}.properties"})
public class ConfigurationFileInject{
    @Value("${user.id}")
    private String userId;

    @Value("${user.name}")
    private String userName;

    @Value("${user.address}")
    private String userAddress;
}
2
3
4
5
6
7
8
9
10
11
12
3.@Value中#{...}和${...}的区别
这里提供一个测试属性文件:test.properties,大致的内容如下所示。
server.name=server1,server2,server3
author.name=binghe
2
测试类Test:引入test.properties文件,作为属性的注入。
@Component
@PropertySource({"classpath:test.properties"})
public class Test {
}
2
3
4
4.${...}的用法
{}里面的内容必须符合SpEL表达式, 通过@Value(“${spelDefault.value}”)可以获取属性文件中对应的值,但是如果属性文件中没有这个属性,则会报错。可以通过赋予默认值解决这个问题,如下所示。
@Value("${author.name:binghe}")
上述代码的含义表示向Bean的属性中注入配置文件中的author.name属性的值,如果配置文件中没有author.name属性,则向Bean的属性中注入默认值binghe。例如下面的代码片段。
@Value("${author.name:binghe}")
private String name;
2
5.#{…}的用法
(1)SpEL:调用字符串Hello World的concat方法
@Value("#{'Hello World'.concat('!')}")
private String helloWorld;
2
(2)SpEL: 调用字符串的getBytes方法,然后调用length属性
@Value("#{'Hello World'.bytes.length}")
private int length;
2
6.${…}和#{…}混合使用
${...}和#{...}可以混合使用,如下文代码执行顺序:传入一个字符串,根据 "," 切分后插入列表中, #{}和${}配合使用,注意单引号。
@Value("#{'${server.name}'.split(',')}")
private List<String> servers;
2
注意:${}和#{}混合实用时,不能${}在外面,#{}在里面。因为Spring执行${}的时机要早于#{},当Spring执行外层的${}时,内部的#{}为空,会执行失败。
7.@Value注解用法总结
#{…}用于执行SpEl表达式,并将内容赋值给属性。${…}主要用于加载外部属性文件中的值。#{…}和${…}可以混合使用,但是必须#{}外面,${}在里面。
# 三、使用案例
@Value的实现案例,我们一起实现吧~~
本节,就基于@Value注解实现向Bean属性中赋值的案例,具体的实现步骤如下所示。
(1)新增test.properties配置文件
在spring-annotation-chapter-11工程下的resources目录下新增test.properties配置文件,内容如下所示。
db.url=jdbc:mysql://localhost:3306/test
(2)新增ValueName类
ValueName类的源码详见:spring-annotation-chapter-11工程下的io.binghe.spring.annotation.chapter11.bean.ValueName。
@Component
public class ValueName {
    private String name;
    public ValueName() {
        this.name = "binghe";
    }
    public String getName() {
        return name;
    }
    public void setName(String name) {
        this.name = name;
    }
}
2
3
4
5
6
7
8
9
10
11
12
13
可以看到,ValueName类上标注了@Component注解,说明当Spring的IOC容器启动时,会向IOC容器中注入ValueName类的Bean对象。
(3)新增ValueConfig类
ValueConfig类的源码详见:spring-annotation-chapter-11工程下的io.binghe.spring.annotation.chapter11.config.ValueConfig。
@Configuration
@ComponentScan(value = {"io.binghe.spring.annotation.chapter11"})
@PropertySource(value = {"classpath:test.properties"})
public class ValueConfig {
    /**
     * 注入普通字符串
     */
    @Value("normalString")
    private String normalString;
    /**
     * 注入操作系统名称
     */
    @Value("#{systemProperties['os.name']}")
    private String osName;
    /**
     * 注入表达式的结果
     */
    @Value("#{ T(java.lang.Math).random() * 100.0 }")
    private double randomNum;
    /**
     * 注入其他Bean的属性
     */
    @Value("#{valueName.name}")
    private String name;
    /**
     * 注入配置文件中的值
     */
    @Value("${db.url}")
    private String dbUrl;
    @Override
    public String toString() {
        return "ValueConfig{" +
                "normalString='" + normalString + '\'' +
                ", osName='" + osName + '\'' +
                ", randomNum=" + randomNum +
                ", name='" + name + '\'' +
                ", dbUrl='" + dbUrl + '\'' +
                '}';
    }
}
2
3
4
5
6
7
8
9
10
11
12
13
14
15
16
17
18
19
20
21
22
23
24
25
26
27
28
29
30
31
32
33
34
35
36
37
38
39
40
可以看到,在ValueConfig类上标注了@Configuration注解,说明ValueConfig类是Spring的配置类。使用@ComponentScan注解指定了扫描的包名是io.binghe.spring.annotation.chapter11。并且使用@PropertySource注解导入了test.properties配置文件。ValueConfig类的字段通过@Value注解注入对应的属性值,代码中有详细的注释,这里不再赘述。
(4)新增ValueTest类
ValueTest类的源码详见:spring-annotation-chapter-11工程下的io.binghe.spring.annotation.chapter11.ValueTest。
public class ValueTest {
    public static void main(String[] args) {
        AnnotationConfigApplicationContext context = new AnnotationConfigApplicationContext(ValueConfig.class);
        ValueConfig valueConfig = context.getBean(ValueConfig.class);
        System.out.println(valueConfig.toString());
    }
}
2
3
4
5
6
7
可以看到,ValueTest类是案例程序的测试类,实现的代码比较简单,这里不再赘述。
(5)运行ValueTest类
运行ValueTest类的main()方法,输出的结果信息如下所示。
ValueConfig{normalString='normalString', osName='Windows 10', randomNum=60.704013358598715, name='binghe', dbUrl='jdbc:mysql://localhost:3306/test'}
可以看到,在ValueTest类中的各个字段值都输出了正确的结果数据。
说明:使用@Value注解向Bean的属性中正确设置了值。
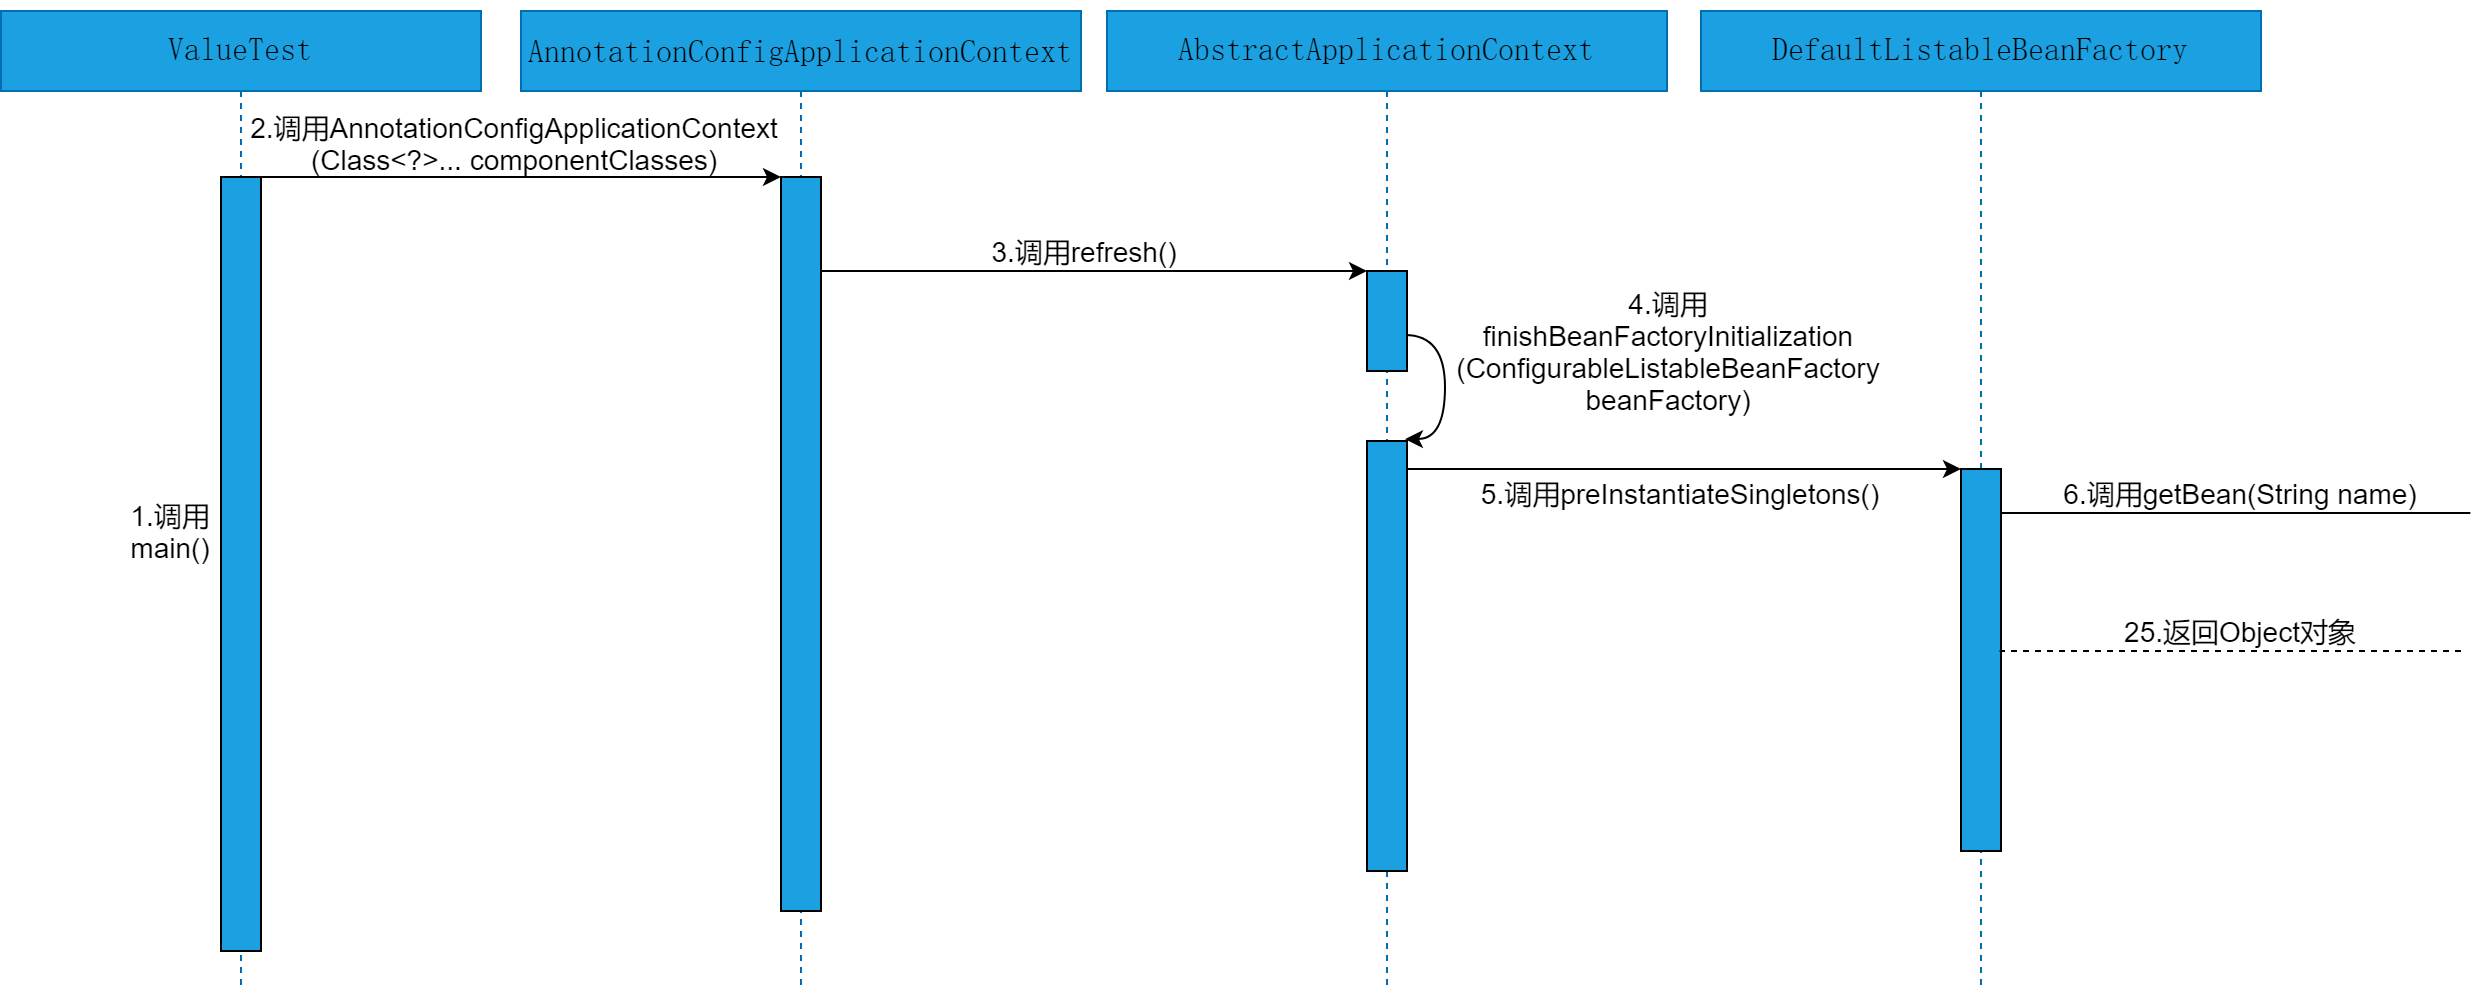
# 四、源码时序图
结合时序图理解源码会事半功倍,你觉得呢?
本节,就以源码时序图的方式,直观的感受下@Value注解在Spring源码层面的执行流程。本节,会从解析并获取 @Value 修饰的属性、为 @Value 修饰属性赋值和使用@Value获取属性值三个方面分析源码时序图。
注意:本节以单例Bean为例分析源码时序图,并且基于@Value注解标注到类的字段上的源码时序图为例进行分析,@Value注解标注到类的方法上的源码时序图与标注到字段上的源码时序图基本相同,不再赘述。
# 4.1 解析并获取@Value修饰的属性
本节,就简单介绍下解析并获取@Value修饰的属性的源码时序图,整体如图11-1~11-2所示。
# 查看完整文章
加入冰河技术 (opens new window)知识星球,解锁完整技术文章与完整代码